In Part 1, we built the foundation of our IoT system. Now for the fun part: giving it a brain. We’ll add the AI Agent that can actually interact with everything we’ve built.
I’ve made some small tweaks to the UI from the last post, mainly adding the chat window you’ll see later, but the core backend is the same.
You can find the full source code for this part on GitHub.
Adding the Brain to the System
Our agent lives inside a simple .NET Web API project. Its first job is to connect to a Large Language Model (LLM). For this, we’ll use OpenAI.
First, you’ll need an API key from OpenAI. I added $5 of credit, but you’ll realistically spend less than a cent trying this out multiple times.
Add your key to the appsettings.Development.json file in the AgentApi project. I suggest using gpt-4o-mini as the model, since it’s cheap and very capable.
{
  "OpenAI": {
    "ApiKey": "YOUR_API_KEY",
    "ModelId": "skynet"
  }
}
Next, I added two important NuGet packages to the project:
These packages give us simple abstractions to work with LLMs. We can use them in Program.cs to register a chat client that our app can use.
builder.Services.AddSingleton<IChatClient>(sp =>
{
    var loggerFactory = sp.GetRequiredService<ILoggerFactory>();

    var openAiClient = new OpenAI.Chat.ChatClient(openAiModelId, openAiApiKey);

    return new ChatClientBuilder(openAiClient.AsIChatClient())
        .UseLogging(loggerFactory)
        .UseFunctionInvocation(loggerFactory, c =>
        {
            c.IncludeDetailedErrors = true;
        })
        .Build(sp);
});
The Code of Hammurabi
Well not really, but we do need to set some ground rules for our agent.
We do this by creating a system prompt. The system prompt is a special message that tells the model how to behave.
Inside the file SystemPrompt.txt we gave the Agent some operating principles, try to change these rules and see how the agent behaves differently!
Giving the Agent control of the system
An LLM can’t magically call our C# code. We have to explicitly give it tools it can use. This is a feature often called Function Calling. We’re essentially creating a list of C# methods the AI is allowed to execute.
These methods are defined in ToolsExtensions.cs. We use AIFunctionFactory to describe our C# methods to the AI.
public static class ToolsExtensions
{
    public static IEnumerable<AITool> GetTools(this IServiceProvider sp)
    {
        var hvacApiClient = sp.GetRequiredService<ClimateCoreApiClient>();

        yield return AIFunctionFactory.Create(
            typeof(ClimateCoreApiClient).GetMethod(nameof(ClimateCoreApiClient.GetAvailableDevicesAsync))!,
            hvacApiClient,
            new AIFunctionFactoryOptions
            {
                Name = "get_available_devices",
                Description = "Gets the IDs and the location of all available HVAC devices.",
            });

        yield return AIFunctionFactory.Create(
            typeof(ClimateCoreApiClient).GetMethod(nameof(ClimateCoreApiClient.GetDeviceStateAsync), [typeof(string)])!,
            hvacApiClient,
            new AIFunctionFactoryOptions
            {
                Name = "get_device_state",
                Description = "Gets the most recent, real-time status of a specific HVAC device.",
            });

...
The Description is the most important part here. It’s how the AI understands what the tool does. A clear, accurate description is the key to getting the AI to use the right tool at the right time.
Putting It All Together: The /chat Endpoint
Now that we have a client, a system prompt, and a set of tools, we can create the /chat endpoint that orchestrates everything.
app.MapPost("/chat", async (
    List<ChatMessage> messages,
    IChatClient client,
    ChatOptions chatOptions) =>
{
    var systemMessage = new ChatMessage(
        ChatRole.System,
        $"{systemPrompt}");

    var fullPrompt = messages.Prepend(systemMessage).ToList();

    var response = await client.GetResponseAsync(fullPrompt, chatOptions);
    return Results.Ok(response.Messages);
});
Notice that with every call, we send the system prompt and the full conversation history from the UI. LLMs are stateless, so we have to provide the full context each time. There are advanced ways to manage this (like summarizing the history), but for our simple case, this works perfectly.
See it in Action
With these pieces in place, the agent can now perform complex, multi-step tasks based on natural language.
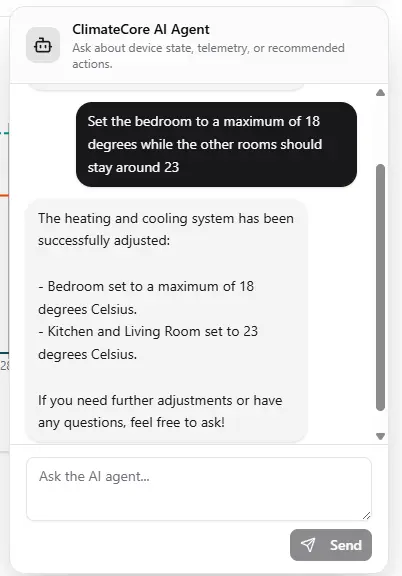
In this conversation:
- I gave it a precise command but I didn’t speak about Ids.
- The agent first called the
get_available_devicestool to get the list of devices and their locations. - Then it called the
set_device_setpointtool for each device, setting the Bedroom to 18 degrees and the others to 23. - Finally, it confirmed the action back to me.
Conclusion
And that’s it! With just a few NuGet packages and some well-described C# methods, we’ve enabled a user to interact with our system in a natural, powerful way.
Of course, production-ready agents require a lot more fine-tuning, error handling, and safety measures. But for now, we have a fun and simple way to play with a custom AI agent.
In the next part, I’ll look into adding more complex tools and, if my computer doesn’t explode, I’ll try to swap out OpenAI for a local LLM so we don’t have to rely on an external service.